

저번에 만든 플로팅 버튼에 추가 기능을 넣어서 더 완성도 있게 만들어 보았다.
내가 원하는 요구사항에 대해 먼저 설명해보자면!
1. 기존 형태는 원의 형태에서 인원이 추가되면 사각형으로 바꾸게 한다.
2. 메뉴가 추가되면 인원박스 아래에 생기게 되는데 메뉴박스 하나당 메뉴의 개수를 조절할 수 있는 버튼과 메뉴를 삭제할 수 있는 버튼을 생성해 줄 것이다.
1. 인원 추가하기
const number = document.querySelectorAll(".number span");

number.forEach((item,index)=>{
  item.addEventListener("click",function(e){
    bar.style.borderRadius = "20px";
    bar.style.justifyContent= 'flex-Start';
    bar.style.marginLeft = ""
    bar.style.width = "220px";
    bar.style.right = "-35%";
    bar.style.flexDirection = "column";
    bar.style.height = "none"
    bar.style.alignItems = "normal";
    bar.innerHTML = `<div class="member">
    <p>인원: ${e.target.innerText}</p>
    </div>`;
  });
});
먼저 인원을 클릭할 때 플로팅 바가 직사각형 모형으로 바뀌게 속성을 바꿔주었다.
그리고 forEach함수를 사용해서 각각의 number를 클릭할 때 마다 innerText를 사용해서 그 값이 바뀌도록 해줬다.
2. 메뉴 추가하기
menu.forEach((item)=>{
  item.addEventListener("click",function(e){
    bar.innerHTML += `
    <div class="menuBox">
          <div class="menuName">${e.target.firstElementChild.firstElementChild.innerText}</div>
          <div class="menuCost">
            <div class="menuCost_left">
              <button class="delete" onclick="del(this)">X</button>
              <div class="cost" value="${e.target.firstElementChild.children[1].innerText}">${e.target.firstElementChild.children[1].innerText}</div>
              <div  >원</div>
            </div>
            <div class="menuCost_right">
              <button class="minus" onclick="minus(this)">-</button>
              <div class="su">1</div>
              <button class="plus" onclick="plus(this)">+</button>
            </div>
          </div>`;
  },{once:true})  // once:true 한번만 클릭하게 하기
})
인원을 추가했을 때와 비슷한 원리를 사용해서 forEach함수를 사용해서 각각의 메뉴를 클릭할 때마다 innerText를 통해 menu박스를 만들어주었다.
여기서 중요한 점은 event를 써서 사용자가 클릭한 그 대상의 정보만 가져왔다. 그리고 각각의 버튼에 대해서는 함수를 따로 만들어서 해당 버튼이 눌렀을때의 필요한 요소를 수정할 수 있게 해줬다.
3. 버튼 함수( +버튼)
function plus(el){
  const result = el.parentNode.parentNode.childNodes[3].childNodes[3];  //총 인원태그
  let cost = el.parentNode.parentNode.firstElementChild.childNodes[3];  //총 가격태그
  let total = el.parentNode.parentNode.firstElementChild.childNodes[3].innerText;  //총 가격
  let number = el.parentNode.parentNode.childNodes[3].childNodes[3].innerText; //총 수
  const realcost = el.parentNode.parentNode.firstElementChild.childNodes[3].getAttribute("value"); //메뉴 하나당 가격(불변)
  number = parseInt(number)+1;
  total = parseInt(total)+parseInt(realcost);
  result.innerText = number;
  cost.innerText = `${total}`;
}
가격과 인원수를 증가시키는 함수다.
각각의 요소들을 변수로 설정해 준 다음 데이터 타입이 string으로 되있기 때문에 정수 형태로 바꿔준다.
총 인원은 버튼이 눌릴때마다 1씩 증가하게 해줬다.
총 가격은 총 가격(total)에 클릭될 때마다 원래가격(realcost)를 더해준다. 여기서 중요한 점은 원래가격은 불변해야 된다는 점이다. 그래서 나는 따로 value값으로 빼주었다.
총 가격이 나오면 innerText로 값을 넣어준다.
4.버튼 함수( -버튼)
function minus(el){
  const result = el.parentNode.parentNode.childNodes[3].childNodes[3];  //총 인원태그
  let cost = el.parentNode.parentNode.firstElementChild.childNodes[3];  //총 가격태그
  let total = el.parentNode.parentNode.firstElementChild.childNodes[3].innerText;  //총 가격
  let number = el.parentNode.parentNode.childNodes[3].childNodes[3].innerText; //총 수
  const realcost = el.parentNode.parentNode.firstElementChild.childNodes[3].getAttribute("value"); //메뉴 하나당 가격(불변)
  if(number>1){     // 수량이 1 이상일때마 작동
    number = parseInt(number) -1;
    total = parseInt(total)-parseInt(realcost);
  }
  result.innerText = number;
  cost.innerText = `${total}`;
}
(+)함수랑 비슷한 원리인데 (-)함수는 1이하로 내려가면 안되게 해야된다.
따라서 if 문을 통해 1이상일 때만 작동되게 해줬다.
5. 메뉴 지우기 함수
function del(el){         //박스 삭제
  const menuBox = document.querySelector(".menuBox");
  menuBox.remove();
}
(x)버튼을 누르면 해당 메뉴 박스를 지워줫다.

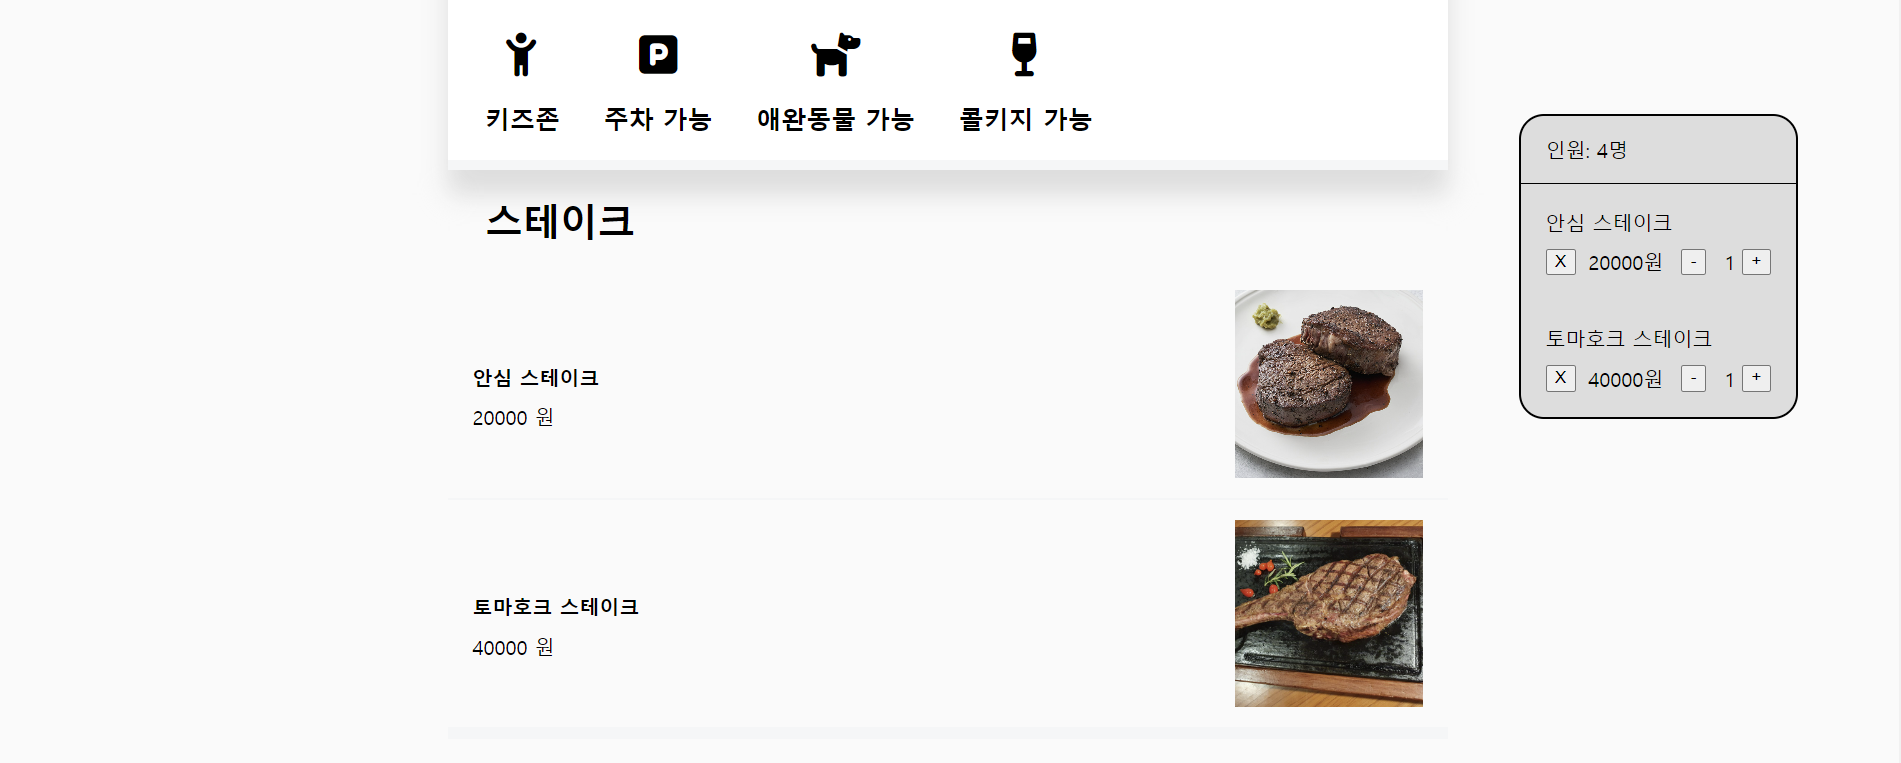
완성된 모습이다. 이번 과제를 통해 어려운 점이 많았지만 지금 생각하면 왜 그렇게 헤맸나 싶다.
메뉴를 추가하고 각각의 버튼을 누르면 그 메뉴에 맞는 가격과 수량이 증가해야 되는데 그 부분이 잘 안되서 오래걸렸다..
이점은 this속성을 사용해서 해결할 수 있었다. this속성을 사용하니깐 버튼이 눌렸을때의 위치에서 요소를 찾을 수 있었다.
this의 존재는 알고있었지만 막상 활용 하려다 보니 잘 생각나지 않았던것 같다.
이번 작품을 통해 한층 더 성장 할 수있었다.
'졸업작품' 카테고리의 다른 글
| [버그 수정] - 실시간으로 변하는 장바구니 만들기 (0) | 2023.03.18 |
|---|---|
| [작품] - 실시간으로 변하는 장바구니 만들기 (0) | 2023.03.16 |
| [작품] - JS로 스크롤 따라오는 플로팅 버튼 만들기 (0) | 2023.02.19 |
| [작품] - 마우스로 가로 스크롤 제어하기 (0) | 2023.02.18 |
| [졸업작품] - 제작 5주차 (0) | 2023.02.12 |